
THE PERfect Bass SETUP - and how to get it!
Actually, even some die-hard pro players don´t really know how to set up a bass right. Quite strange... everybody knows that their car needs to be serviced regularily to have a great performance... but then they play with dead strings and wonder why there is no intonation! Well, if you set up your bass every once in a while it will be easier to play and it will sound better. You don´t neccessarily have to read on if you have a personal bass tech who keeps your basses in top condition! For all others, I have written this little book so you can tweak your bass by yourself - and save some money! See the video, and have some insight in the book´s content!
STRINGS DON´T LAST FOREVER
One player can do with one set for half a year, the next one needs a new set at every gig... Strings are moving parts that are abused a lot and only have a short life span – depending on how hard you play, and how tough you sweat! It also depends on the sound requirements: if you want a super clean tone with brilliant crisp highs, you need new strings more often than the rocker favouring a dark sound with little high end. When your tone gets dull and it gets harder and harder to get the strings in tune, you are in need of a new set.
GETTING IT RIGHT
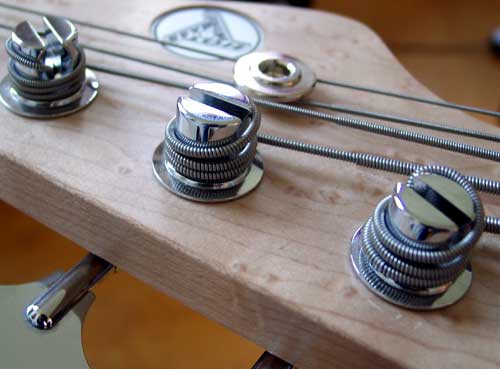
Also very important: The proper way of putting new strings on the bass! Don´t cut them off too short! Rather put a few windings around the string post and make sure the string is close to the headstock as you see in the picture!
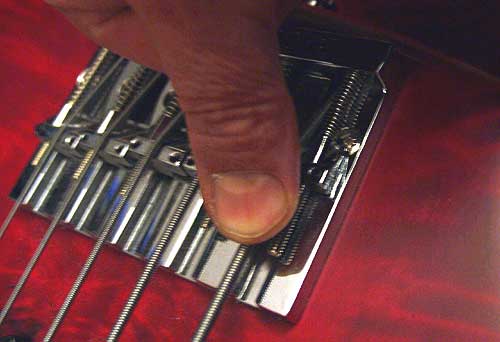
ADD PRESSURE
Also firmly press with the thumb on the A, E and B strings at the bridge just in front the string saddles as to ensure a proper fit.

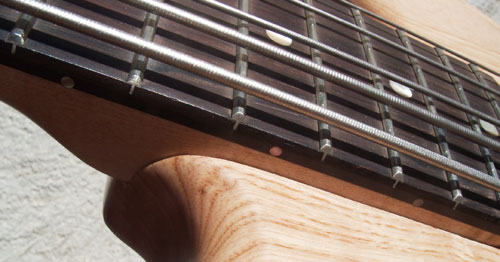
GET ACTION
That´s the distance from the strings to the fretboard, also known as "action". A high string set-up gives you a better tone, because the string can vibrate more freely, but your fretting hand has to work harder. A low string set-up makes you play with more ease, but there might be more fret noises because the vibrating string, being closer to the fretboard, is occasionally touching the frets. The string height is defined by the setting of the bridge saddles and the truss rod. The height of the nut also makes a difference. BIG difference, really.

THE NUT
The nut can be made from bone, plastic, brass, graphite or ebony. It depends on how it has been filed! As a rule of thumb, the strings have to sit firmly in the saddle. If it is too high, the first frets might not be so easy to fret, if it is too low, the strings might rattle in the first fret positions.

FRETS DON´T FAIL ME NOW
Frets wear out sooner or later, depending on how hard you play and what strings you use, resulting in buzzing and rattling noises where the strings touch the frets which are of different heights. A qualified guitar repairman can give you a good fret job which will make quite a difference.

TAKE ME TO THE BRIDGE
Here we can control the height of the individual strings by adjusting the string saddles. Depending on the type, we need one or more Allen wrenches to turn those little screws until we are happy with the string height.

FEEL THE NECK
For a cool feel on the bass neck we have to get the truss rod properly set up. As the strings put a lot of pull on the neck, every wooden bass neck has a truss rod which can be adjusted with the right fitting tool. You find the adjusting screw either at the headstock or at the end of the neck, in which case, you might have to take off the neck to get to turn the screw. Turning clockwise (pull the wrench gently towards you when the bass lies in front of you with the head to the left) tightens the truss rod, and the neck moves backwards, resulting in the strings coming closer towards the neck. Turning the neck screw counter-clockwise (away from you) relieves the truss rod, and the strings move away from the fretboard.

JUST NOT EXACTLY STRAIGHT
The neck has to be a bit "concave" for a good setup. If the neck is too concave, you can use the bass as a bow to shoot some arrows at your local repairman - or your wife! There must be some relief between the string and the seventh fret when you fret the lowest string at the first and last fret and then look at it from the side of the neck. If you can slip a guitar pick underneath, it´s just right.

NECK ANGLE
You can adjust the neck angle on basses with bolt-on necks. Some instruments like 70ies Fenders, Music Man, and G&L, already have an adjusting screw on the (three bolt) neck plate. On most others you can put a shim in the neck Pocket, and it will make quite a difference, but you need some experience for it. It might require taking off the neck several times to find just the right thickness of material... Details are in the book!

INTONATION - GET IT RIGHT
Get your tuner out for that one! Compare each string´s fretted note at the 12th fret with the 12th fret´s harmonic. Both have to have the exact same frequency, in which case the intonation is OK. In order to achieve this, we have to move the string saddles in the bridge. Moving forward makes the string shorter which means the note gets higher, moving backward makes the note lower.

TOUGH STUFF!
Absolutely, you might think, if you haven´t done it before! Right... it´s science – bass science! A correct bass setup is the ultimate combination of all parts. If you are curious, you can have a look at the book´s content by going to Amazon and type:
THE PERFECT BASS SETUP - AND HOW TO GET IT!
Send your questions to: bert@hotwire-bass.de
or call the Hot Wire Hotline: 0049 6753 94571